A number of older ScanSnap scanners released by Fujitsu are no longer supported and the official line from Fujitsu is to buy new hardware. However, the ScanSnap range isn’t cheap and you can avoid spending a large sum by utilizing Compatibility Mode built into Windows to get your older scanner working with the latest versions of Windows.
Update: 21st October 2017
A recent windows update caused issues with my 11-year old ScanSnap fi-5110ex02 – when the scanner was powered on, the ScanSnap Manager program could not detect the scanner and as a result I couldn’t scan anything at all. “Oh well“, I though, time to re-install the software using the guide below that I originally wrote back in 2012.
However, before proceeding – I noticed a comment from Chris Morse that said he managed to get his S510 working perfectly using the software for the ScanSnap iX500, which is fully supported on Windows 10. So I decided to give it a go for my fi-5110ex02 and I’m pleased to report that it worked perfectly.
It just goes to show that Fujitsu can support older ScanSnap devices on Windows 10, but simply choose not to do so in order to encourage people to buy new hardware.
1. Download Software
All drivers and software are available directly from the Software Downloads section of the Fujitsu website, organized by model number. Click through to your model (we’ll be using the fi-5110exo2 in our examples) and you’ll see a table similar to the one below:

Download the setup program for “ScanSnap Manager” and then select the Update tab to find the most recent software update made available by Fujitsu.
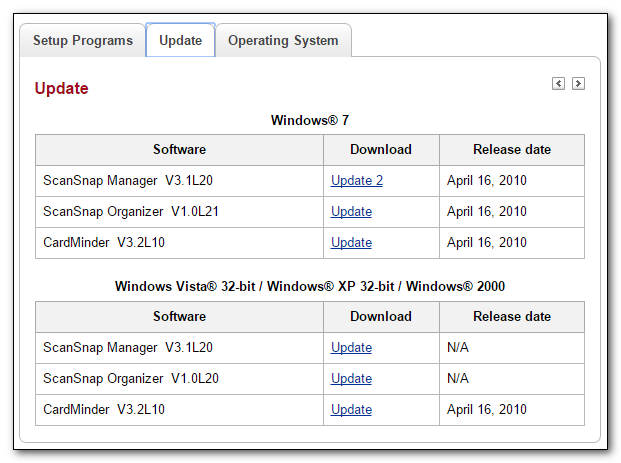
As you can see above, the last update made available for the fi-5110exo2 is for Windows 7. Download it anyway and make a note of the version of Windows as you’ll need to know that when entering compatibility mode settings.
2. Disconnect or turn off your ScanSnap scanner.
You must ensure that your ScanSnap scanner is either disconnected or turned off until you reach step 7 – if you don’t, then Windows will detect the scanner too early.
3. Uninstall existing ScanSnap software
If you obtained Windows 10 as an upgrade to Windows 7 or 8, then you will have the ScanSnap software already installed (but not working). It’s important that you uninstall any existing ScanSnap Manager software and reboot before proceeding.
4. Install the Setup program
Firstly, ensure that the scanner is turned off and the lid closed.
Now run the ScanSnap Manager setup program that you downloaded in Step 1, which will extract the software to a subdirectory. Once extracted, navigate into the directory and run setup.exe to install ScanSnap Manager.
5. Reboot
Reboot – If you don’t, the next step probably won’t work (it didn’t for me with the fi-5510exo2)
6. Install the Update using compatibility mode
This is the final and the most important step. You need to tell Windows to run the ScanSnap Manager Update in compatibility mode for the version of Windows that it was created for.
Right click – do not double-click – on the Update program that you downloaded in Step 1, and Select “Troubleshoot Compatibility” from the context menu that appears.

Windows will launch the “Program Compatibility Troubleshooter“, with options to use recommended settings or to manually choose compatibility settings. Select the second option, “Troubleshoot program“
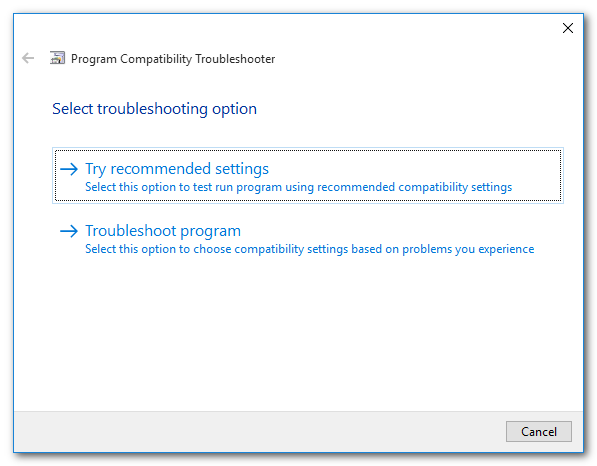
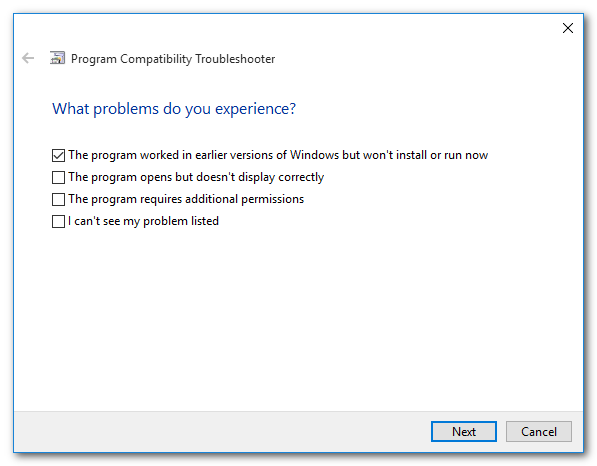
We know that the update program was written for a prior version of Windows, therefore you should select the first option “The program worked in earlier versions of Windows but won’t install or run now” and click “Next”
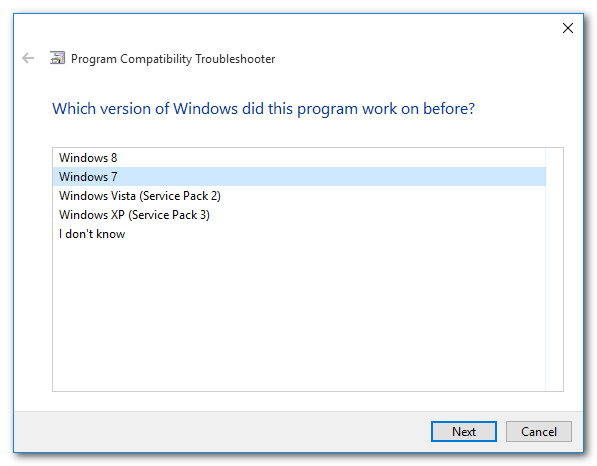
Select the version of Windows that the update file was designed for (which you noted down in step 1) and click “Next”.
In the case of the fi-5110exo2 this was Windows 7.
Click “Test the program…” and the update program will run.
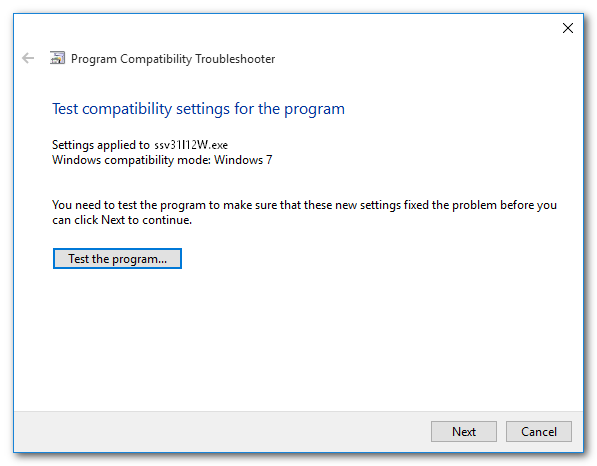
After finishing the installation, click “Yes, save these settings for this program“.

7. Turn on your ScanSnap
Finally, turn on your ScanSnap scanner and it should be detected correctly. Perform a test scan to confirm everything is working as expected.
… and finally.
If you have tested a ScanSnap model which doesn’t appear in the table at the top of this article then please post a comment below confirming the model number that you got working, the version of windows it is working on (e.g. Windows 10) and the version of Windows that was chosen in the Compatibility troubleshooter.
Happy scanning!
Sometimes, if you’ve already tried installing the ScanSnap software and it hasn’t worked then it is advisable to take everything back to basics as follows before using the guide above.
1. Disconnect the scanner
2. Uninstall any Fujitsu ScanSnap software and drivers
3. Reboot
4 Install using the guide above
5. Reconnect the scanner
NOTE: It’s important to install the software first, before connecting / powering on the scanner.
LikeLike
Not that this will surprise anyone, but the fix worked perfectly for the ScanSnap model fi-5110eox in Windows 8.1 Pro, with Windows 7 chosen in the Compatibility troubleshooter. Next up, moving to Windows 10 pro.
LikeLike
This worked for me on S510 but with one slight difference from your instructions. When I click the “Test the program” button on the update, the program doesn’t run immediately. I need to allow it to Run first. And then after it runs it reboots, so I never got to the Yes, Save these settings. But it is working. Thank you.
LikeLike
Could you confirm which version of Windows 10 you are using – Home or Pro? Also, did you choose Windows 7 in the compatibility mode settings or something different?
LikeLike
Hi there, thank you for this post. However when I tried to run it as suggested in the compatibility program it says: “Since ScanSnap Manager is not installed, it is not necessary to execute this set up”:
I use S500 and Windows 10 Home
Thank you!
These are the file I used from Fujitsu’s website:
setup program :ssv40l11W
update: ssv40l20up2
LikeLike
That’s strange. It sounds as though the original setup program (ssv40l11w) hasn’t completed successfully and therefore the upgrade is refusing to run. I’m assuming you did an Windows 10 upgrade (rather than a fresh install)), so did you uninstall the existing scansnap software and reboot before following the guide?
LikeLike
Hi Robert, I had not have the snapscan installed on this laptop.. I just tried to instal it the first time by following your instructions but something went wrong. I may need to clean all snapscan related files and refollow your steps. Do you have any tricks in terms of how I can get rid of all the little pieces of snapscan files that may be in the laptop so that it will not interfere with the new install?
Thks a lot!
Bruce
LikeLike
Yes! it works perfectly now. Thanks a bunch Robert!
LikeLike
for others experiencing the same problem .. my scanner is S500 I am using Windows 10 and I picked Windows 7 from the compatibility chart
LikeLike
Amazing. Thank you for this fix. I spent two hours going in circles (their website can be a little confusing), and I finally reached out to their customer service, only to have them tell me they weren’t supporting 510 anymore since it’s “close to ten years old.” I said that if something’s still working at ten years and that’s a problem, their company has an even bigger problem. It took me a bit to get it figured out for 510 – after downloading the setup, the update has two pieces, but you only have to install the second (in compatibility mode) update to get it working. So, it took me half an hour, but I just did my test scan, and it worked! Thanks a ton!
LikeLike
i tried the installation like the description above, but i got the meesage: this product isnt run with 64bit system. Is there a chance to handle this?
LikeLike
It sounds like you have downloaded the 64-bit versions of the Scansnap software and your machine is 32-bit (or you have the 32-bit version of Windows installed).
LikeLike
no, i have a 64 bit pc and also installed win 10 for this system.
I have found only one version of the scansnap software and no special “64 bit” version. May thats the problem. Does there exist a 64 bit verison of the scansnap software?
LikeLike
I’m not sure which model you are using, but my model (the fi-5110ex02) is listed on the download pages as:
Scansnap Software – 32 bit
Scansnap Update – 32 / 64 bit.
LikeLike
I just tested this with a Scansnap S300 and it works on Windows 10. I downloaded the ScanSnap Manager V4.2L14 setup file and the ScanSnap Manager V4.2L32 update files and ran them as described. I selected Windows 8 in the compatibility troubleshooter. All good here. Thanks! Saved myself $270 on having to buy a new scanner.
LikeLike
Worked like a charm with my s500 on Windows 10 upgrade. Thanks!
LikeLike
Hi Clinton Did you also install ScanSnap Organiser for your S300? If so,
in which order – i.e. did you install Organiser+Update after completing
Manager+Update as described above, or install original Manager and
Organiser, and then apply both Updates? Grateful for your help.
LikeLike
This worked perfectly on the first attempt for my good friend, a 2006 model Fujitsu fi-5110EOX ScanSNAP using Windows 10 Pro on an x64-based processor. PG
LikeLike
I more-or-less stumbled on this method (using compatibility mode) for getting my S500 working on a “clean” Win 10 Home installation. (Specifically, I had to run the “ssv402l20up2.exe” update as a Windows 7 program.) I’m glad to see that other folks are using the S500 successfully this way. Unfortunately, I am seeing one problem: I cannot generate searchable PDFs, either while scanning or afterwards. I have installed the version of FineReader that came with the S500, but it doesn’t seem that the ScanSnap software is using it. I wonder if anyone else is seeing this problem and, if so, whether any solution has been found? MANY THANKS
LikeLike
I just want to say THANK YOU! This is the third time, that latest being this morning, that I have used this fix so I could keep using my S500. Your instructions and screen shots are excellent.
LikeLike
My old S500 now works fine under the latest 64-bit version (1511) of Windows 10 Home. The only problem was that I had to run the original ScanSnap installation, in addition to the update, in compatibility mode. If the installation was NOT run in compatibility mode everything SEEMED to work EXCEPT I could not make the scanned documents searchable. BTW I’m using a copy of Adobe 9 Pro that I had already installed, so I did not need the Version 7 of Acrobat that came with the S500.
LikeLike
S500 with windows 10. ScanSnap Manager has been updated to V4.0, so the screenshots need to be updated.
1. Download “ScanSnap Manager V4.0L11”, and install it using compatibility mode (win7).
2. Download Update “ScanSnap ManagerV4.0L20 for Win7” (32-bit or 64-bit), and install it using compatibility mode.
3. Turn on your S500. It should work fine!
LikeLike
Thanks-it works with new Dell Windows 10. The only issue is the light in the scanner turns on with the scanner and does not turn off. Any thoughts? fi-5110exo2.
LikeLike
Mine has the same issue.
LikeLike
thank you for this fix. I am delighted that following your clear instructions has allowed me to continue to use my S500 with Windows 10.
LikeLike
Great! Worked for me, although screens and files are newer.
LikeLike
2/6/16… Worked great. installed version ssv40120up2 and I’m in business. Good instructions. Can’t thank you enough.
LikeLike
2/23/16… Thought everything was working great with my S500 under Windows 10, but I just noticed that the OCRing is very inferior to what it is on my old Windows 7 system. Both systems have Adobe 9 Pro installed, although the Win 7 system is 32-bit while the Win 10 is 64-bit. Also, both systems have standalone versions of Finereader installed and I did NOT install Finereader-for-ScanSnap on either system.
After I create a searchable PDF on the new Win 10 system I get a file that is considerable smaller (60K rather than 80K) and where far fewer words can be found when searching that file.
I’m unclear as to which program – Acrobat or Finereader or something else – is being used for doing the OCRing. Strangely, testing seems to show that the searchable file created within ScanSnap is of much lower quality than one generated by EITHER Acrobat or Finereader!
Any thoughts/suggestions would be greatly appreciated!
LikeLike
Very odd – my only thought would be to check the scanning resolution is the same as you had it on Windows 7, but considering the testing you’ve done you’ve probably already checked that!
LikeLike
Robert,
Thanks for your comments! I’ve just done a test of scanning a page on the Win 10 system, copying the resulting PDF to the Win 7 system, and running the OCR there. The results are the same as before – starting from the same scanned file, the Win 7 OCRed file is about 20KB larger and much more accurate.
The only difference that I know of (other than the operating system) is that the Win 7 system has versions 7, 9, and 11 of Finereader installed, while the Win 10 system has only version 11. (I’m not sure how to “disable” the 7 and 9 versions without uninstalling them, which I really don’t want to do!)
DO YOU KNOW OF ANY WAY TO TELL WHAT PROGRAM IS ACTUALLY BEING USED (Acrobat, Finereader, etc.) WHEN OCR PROCESSING IS BEING DONE UNDER SCANSNAP MANAGER?
Many thanks,
Wayne
LikeLike
I don’t know how to determine which version is being used, but you could temporarily rename the executables for one version at a time and see which throws an error when you run the OCR! (then rename them back again). That way you don’t need to uninstall anything.
LikeLike
Well, I renamed all of the Finereader directories under “Program Files” on my Win 7 system, but that didn’t change anything. Thinking back a bit, though, I’m quite sure I tested the Scansnap OCRing on the Win 10 system BEFORE installing ANY version of Finereader on that system & got the same inferior results. That is when I installed Finereader 11 with the hope that it would improve things (but is clearly didn’t).
It really seems that Scansnap does not integrate with any standalone version of Finereader and relies on Acrobat if the special Scansnap version of Finereader has not been installed. BOTTOM LINE: It really seems that my version of Acrobat 9 is not functioning 100% on the Windows 10 system. I installed that version in the normal way, but I think it might be wise to try installing it in compatibility mode and see if that helps anything! I’ll keep you posted.
LikeLike
Well, things are getting stranger and stranger! First off, installing Acrobat 9 using Compatibility Mode didn’t change anything. Then I renamed the Acrobat directory under Program Files (x86) to disable Acrobat and that made no difference either (except that I couldn’t view the resulting PDF file until I reactivated Acrobat). It really appears that Scansnap has some inferior “internal” OCR mechanism that kicks in when the program cannot (for some reason) use either Acrobat or Finereader.
In another test I used Acrobat 9 to directly OCR the scanned file. This resulted in a slightly SMALLER file (55K instead of the original 60K) with good character recognition. Perhaps the best solution is to forget about using Scansnap to OCR files and just rely of Acrobat!
LikeLike
ScanSnap fi-5110EOX2
I used your technique and finally got my ScanSnap to work in my Windows 10 Pro 64 partition. Thanks big time for that. I was having to go to a dual boot back to Windows 7 to use it.
Note that I was getting this error “Failed to initialize driver module Err=0x80210019” when I installed the first file, ssv31l12W.exe. As expected the installed failed after that. So guess what? I used your Troubleshooting process to install that first file too and voila it worked. No driver error.The second file went in fine as you stated and now it all works.
Thanks again.
Hugh (in Palm Springs)
LikeLike
I followed the instructions with my S500 & running Windows 10 64-bit and it worked fine. But after shutting down then trying to use it couple weeks later-no luck. The blue light on the scanner goes on then goes off, won’t scan. I really don’t feel like uninstalling and re-installing every time I want to use it. Any suggestions?
LikeLike
I just followed this process on a ScanSnap S300M running under Windows 10.
While this model is officially for Macs, I had managed to install it successfully under Windows 7 using the instructions here: http://techenvy.com/hack/using-a-mac-scansnap-300m-on-a-windows-pc#comment-58020
However, it didn’t work on Windows 10. When I right-clicked the INF file to install, Windows 10 complained that “The hash for the file is not present in the specified catalog file. The file is likely corrupt or the victim of tampering.”
I then restarted the computer without Driver signing (http://acer.custhelp.com/app/answers/detail/a_id/38289/~/windows-10%3A-disable-signed-driver-enforcement) and the driver successfully installed.
Thank you!
LikeLike
I followed the instructions to the “T” and it works with my little S1100. When I looked at the “update” tab in step 1, it just said “Windows” and on the 3rd tab marked “operating system” it deceivingly says that these older models are compatible with Windows 8, 8.1, and 10. Not true as we all know!
Anyway, in step 6 under “which version of Windows did this work before?” I chose 7, because it did work on my other win7 machine, and now it works like a charm!
Thanks for the instructions unknown author!
Completely random: I have a site dedicated to self-help for leveraging technology in your real estate business: http://www.techinre.com (just thought I’d share since its related)
LikeLike
I have the fi-5110EOX2 model which worked under Windows 7 and I just did an upgrade to Windows 10. The ScanSnap website had a setup program (V4.5L10). The update was the identical program (V4.5L10). I just installed the setup program, following your instructions and it worked. Thanks ever so much!
LikeLike
Brilliant! Was able to use my old 2004 ScanSnap on my Windows 10 Enterprise o/s. Thank you. (Note: my ScanSnap is the EOX version, the setup and update file were the same, the only modification was to skip steps 4&5 and go directly to 6).
LikeLike
I just wanted to thank you for this step-by-step guide. This way I can continue to use my old S500 on Windows 10.
Thank you very much!
LikeLike
SnapscanS1500 now working on Windows 10 – MANY thanks.
LikeLike
got my trusty old s510 to work on windows 10
Thank you, Thank you, Thank you!!!
LikeLike
Thanks very much! My S500 works with Windows 10 after all!! I had been using a Windows XP old PC just to run the scanner but that died on me so went with your solution, very kind of you to share it.
LikeLike
Wow thanks so much for taking the time to post this useful explanation. It’s now working perfectly with Windows 10, with my S510 model. Thanks a lot
LikeLike
I have been disappointed that my S500 wouldn’t work with later versions of Windows and wasn’t willing to buy a new $500 scanner when this one worked fine. Thank you so much for the fix; I really appreciate it.
LikeLike
Thanks. Adapting these instructions got my S300 working.
There was no update only the setup file, so the answer was to install that in compatability mode.
LikeLike
This instruction from Oracle DBA Resources has allowed me to continue using my ScanSnap S510 which I paid a pretty penny for when I bought it new expecting a decent life out of it. The instructions worked perfectly however, there is no indicator that the test is complete or worked when I selected the “test program” button. I also had to open the application from its folder in Windows explorer to run it in compatibility mode since that option did pop up from the app in the start menu. I am using Windows 10 and set my ScanSnap Manager to run in compatibility mode with Windows 7.
LikeLike
Thank you SO much for this clear guidance. It worked perfectly on my S500.
LikeLike
Thank you very much for posting this. I was able to get my 2006 5110EOX2 to work on my new Windows 10 install after a hard drive crash forced me to install a newer version of the OS. Thanks again, it’s very much appreciated.
LikeLike
THANK YOU!!! Second time you saved my scanner and my sanity!!! THANK YOU!!!! Worked again on my 5110EOX2 after a huge Windows update last week!!!! You are an angel!!!
LikeLike
Thank you for a great explanation. i was able to get a S500 going (it seems to be working). I only installed the Manager file, WinScanSnapManagerV45L10WW.exe. I did not use the compatibility method (there does not seem to be an update on the Fujitsu web site, so all I did was install the one Manager application). I haven’t tried installing the organizer, not sure I would use this. Thanks again.
LikeLike
Thank you. Once I came across your clear instructions I was able to get my S1300 running with Windows 10 Pro (Creators Update). Running the ScanSnap Manager Update in compatibility mode for Windows 7 was the key factor for me. Thanks again.
LikeLike
Ahhhh so very thankful for this page. My S300 is NOW working on my new laptop. Thank you for your efforts.
LikeLike
The ScanSnap iX500 software is supported in Windows 10 and works perfectly with my S510 (on Windows 10 Pro x64). I didn’t have to jump through any compatibility hoops. Likely it will work with other models but I haven’t tried it.
http://www.fujitsu.com/global/support/products/computing/peripheral/scanners/scansnap/software/ix500.html
LikeLike
I have installed my ScanSnap S1500 on my old XP laptop. I get an error ScanSnap Manager failed to initialize driver module 0x80210019. Has anyone experienced this.
Next I will try to get the software to work on my new Win 10 laptop.
LikeLike
Para los españoles que lean la página.
Mi problema era con el Scansnap S300 y windows 10. Aplicando la solución explicada arriba ha funcionado perfectamente. Además el Scan Manager funciona muy rápido. Todo perfecto a la primera.. Gracias por la ayuda.
LikeLike
fi-5110EOX2 funziona benissimo con Win 10 Pro. Grazie infinite, stavo per spendere 450,00 €. per ix-500.
LikeLike
Scansnap S500 – Model from 2006. Instructions work for Windows 10. Download the Scansnap Manager V45L from the Fujitsu site. There are 32 and 64 bit files available. AS OF THIS DATE THERE ARE NO UPDATES FOR THE SOFTWARE…JUST DOWNLOAD THE SCANSNAP MANAGER V45L THEN ‘RIGHT CLICK’ ON YOUR DOWNLOAD AND FOLLOW THE TROUBLESHOOT COMPATIBILITY DIRECTIONS FROM THERE. Use Windows 7 as your option. If you installed the Scansnap file without the compatibility mode…uninstall the software from control panel, Apps.Reboot,then install the file again with the ‘right click’ troubleshoot compatibility. LAST POINT…THESE SCANNERS ARE NOT SERVICED ANY LONGER AND PARTS ARE SCARCE. I PURCHASED AN ENTIRE UNIT ON EBAY FOR $50 INCLUDING SHIPPING AND WAS ABLE TO SWAP A BROKEN COMPONENT EASILY. GREAT SCANNER LIVES ON.
LikeLike
So, you’re my hero. I’m a 67 year-old business owner woman who’s son has taught her to search google for computer-related problems. He recently reinstalled windows 10 for me after a windows crash, and I then couldn’t find the software for my wonderful S510. I found your post and saw this little nugget (“However, before proceeding – I noticed a comment from Chris Morse that said he managed to get his S510 working perfectly using the software for the ScanSnap iX500, which is fully supported on Windows 10. So I decided to give it a go for my fi-5110ex02 and I’m pleased to report that it worked perfectly.”) So I tried it, and not only did it work perfectly, but it REINSTATED the function of scanning directly to an email–a function that had stopped being supported when I had the “correct” software for my S510. So THANK YOU!!!
LikeLike
I agree so thank you!!!!!
LikeLike
Thank your Robert, I have an Fi-5110EOX2. Still working perfectly after 10 years of heavy workload. I had to buy a new laptop with Windows 10 64 bit. The first method of downloading software for ix500 didn’t seem to work for me so I reverted to the other method of downloading the old drivers for Windows 7 (V4.5L10) for scansnap manager and organiser, saving them first then going into the downloaded files and right clicking on “compatibility issues” and saying that they previously worked in windows 7. Once they had downloaded I then rebooted and just had to go into Scansnap manager and alter the scan settings for my preferences and -“hey-presto” it all works perfectly!!!. Lets hope Fujitsu keep the driver downloads for windows 7 on their website for many years to come as this method still seems to work. Thank yo to all other posters for hints and tips which kept me going well into the early hours until eventual success!!!
LikeLike
I want to have my scans sent to desktop, but even though my old Scansnap S1500 appears to be now set up on my new Surface Pro, with Windows 10, I do not have any option to change the location to anything except where it is set now, which is to “pictures.” I do not want my scans to go to “pictures.” I want them either to desktop or to a specified folder. The box for scan location will not, however, let me make any changes – only to pictures. In windows 7 I got a dropdown that allowed me to change the location. Do you know how I can change this?
LikeLike
terborac’s solution worked for me.S500 with 64bit 10.
LikeLike
Hello,
Thank you for these instructions. In January 2020 I have upgraded to Windows 10 and didn’t want to bin the S500 which still works perfectly for me. I did as you said and downloaded the info for the iX500 and the update for the S500. I was able to get the blue “S” icon on the taskbar for right clicking (my favoured method of working).
I managed to get ScanSnap to save to a folder without automatic file naming. So everything back to normal.
Thank you for your instructions.
Chris
LikeLike